Thursday, March 21, 2013

33 weeks

I am 33 weeks along this week with Baby Sister or GoGo as Lila calls her.  We are just about ready.  The nursery could use a little more TLC, but I really need to come up with some wall decor.  It's a little bare right now.  :(  I did get some quality time with my sewing machine last week to make some baby things for my sister-in-law's baby shower.  She's due a week ahead of me and is also having a girl.  There's going to be a lot of baby stuff this summer.  On top of that, lots of PINK!

Speaking of pink,  I've been purchasing a few items for the baby in the clothing department.  Since Lila was born in September, the seasons are off just enough to where this baby won't get to use quite as much as we were hoping.  I think once the fall and winter are here, we may be able to use some stuff, but this poor child is entitled to her share of "new" stuff too, right?  :)  Some of the cutest things I've found have NOT been pink and I'm thrilled!  Seems like all things little girl are pink.  I was even able to find matching (sorta, which is good because I'm not big on "matchy matchy" outfits) for Lila and baby.

Not really much else to talk about as of right now.  Things have sorta died down a little around our house since basketball is over and Capel's basketball team brought home the STATE CHAMP trophy!!  WOOOOOOHOOOOOOOOOOOOOO!!!!!!!!!!!!!!!!!!!!  In case you can't tell, we're all pretty happy (and a little proud) of these boys!  Great kids!

Here's the pics for those of you asking.  I feel like I always look a lot more tired in every pic during this pregnanct.  LOL  I wonder why!!

So this is me pregnant with baby now at 33 weeks

And this is 32 weeks with Lila


Tuesday, March 5, 2013

DIY Crib Bumpers

After making the crib skirt last week, I have been so anxious to get started on the bumpers.  I have looked and looked for tips and tutorials and some I have liked a lot, but most of those had piping on them and I honestly didn't know if I was capable of making them with piping.  It didn't look hard, but a couple of bloggers did say it was tedious.  So I just kinda ended up doing my own thing.  I did reference this blog though for certain answers to questions that arose.

I had two yards of the floral fabric I wanted to use, but didn't really have anything for the "backside" of the bumpers.  Since we live a good 45 min away from the nearest open fabric store, I hopped in the car and went to Wal-Mart.  It's not my favorite place, but it would have to do if I was going to get these bumpers done any time soon.  Our Wal-Mart does have pre-cut fabric in two yard sections.  I found a hot pink that went with the floral as best as any color that they had would.  I didn't want to use hot pink, but now that they are done, I'm so glad I went with it.  By the way, I got all of my fabric for the bedding at Hobby Lobby with the exception of the hot pink.

I'm going to try to explain how I did these the best I can, but I'm sure I'll leave something out.  If anyone would have questions (and I don't know why you be asking me, honestly) you can email me and I'll answer!

I started by measuring the crib to see how long each side needed to be.  I made 4 separate bumpers.  Some tutorials you see has them in 6 sections and a lot of store bought bumpers, like the ones we had for Lila, are just one big bumper that goes all the way around.  I liked the look best of the all the way around ones, BUT there was no way I as going to be able to make that look good, so the next best thing was 4 sections.

My crib measured 51" wide and 27" deep.  So for the front and back I needed 52" including the 1/2" seam on both ends.  For the sides I needed 28" including the 1/2 " seam on both ends.  I also knew that I wanted my bumpers to be 10" tall, so I measured 11" to include the seam.  Now, I will say that I kinda wish I would've gone with an extra inch on the width, but I'm not crying over it.  They still look good.


So I made the cuts to 8 pieces of fabric, 4 floral and 4 hot pink, a front and back for each bumper.  I ironed the fabric to make all of the nasty wrinkles, which were especially bad in the hot pink because it was wrapped so tight since it was pre-measured and put into packaging and then started pinning up the seams.


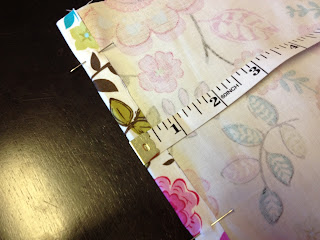
Now I'm going to tell you that I think I probably could've cut about two hours out of my project if I just wanted a regular seam with the two fabrics.  A seam like a pillow case or the one you see in the tutorial I linked above, but of course I had to make things hard.  I wanted a seam like you can see (kind of) below. So I had to (and I did learn a little bit more each time I made a section on how to make the next one a little easier.  Essentially, I had to measure a 1/2" seam 8, I'll say it again, 8 times for each section.  It got a little tiring.


Once I stitched up 3 of the four sides of the bumper, I then got out my quilt batting and eyeballed the measurements of that and then stuffed it in there.  Quilt batting was the best thing I could find to do the stuffing.  I found some memory foam type stuffing that actually looked like it could work, but it was more expensive and I just wasn't sure if it would work for me...being a first timer on this bumper stuff. 


Once I had stuffed it up, I re-pinned that side and stitched it up.  I also read in the blog above that IF she ever made bumpers again, she would use ribbon to tie them on instead of making the ties out of the fabric that she used for the bumpers.  After seeing that I was going to have to measure, cut, and stitch up 28 ties, I very quickly decided that I would just use the ribbon AND cut a few corners and just do 6 ties for each front and back and 4 for the sides.  I stitched the ribbon to the appropriate places on the bumper and that was that!  They were done!


I don't know where I saw this idea of flipping the back bumper the with the "back" facing forward, but I really liked and decided to do it and I'm glad I did.  I really like how it looks.


I feel like the stuffing may be a little scant on the front right side, but I'm not sure that I will be cutting it open and stuffing more in.  I think I'll just call it a lesson learned and see if I can tie it a little differently to make it look better.  All in all, I'm VERY happy with how they turned out.  This is the first time I've ever taken on a project like this and I'm quite proud of myself for not only finishing it, but finishing it successfully!  To see how I made the crib skirt, check out this post!


Friday, March 1, 2013

DIY Crib Skirt

I knew that I didn't want to spend a ton of money on the crib bedding this time (last time we got it as a gift from my girlfriends, but I remember how expensive it was) so I started looking into other options, i.e. making my own.  I found a couple of tutorials on Pinterest and used a really easy one that I really thought was manageable.  The title of this blog post really caught my eye and this is what I ended up going with.  I looked at it and thought, yep...I can do this!  I had three different patterns of material because originally I was going to do a ruffled crib skirt.  I have made a ruffled Christmas Tree skirt, but that was so easy using hot glue!  I knew I didn't want to use hot glue on this and I also knew that I didn't want to spend any extra money experimenting and have to go buy more material.  I wasn't confident enough in making ruffles for this big of a project.  The changing of the plan of what kind of skirt I was going to do kinda threw a wrench in my plan and I wasn't sure if the amount of material I got for each pattern was going to work.  But I just started it and got as much done as I could.

These are the three patterns I chose.  I was really excited once I finally picked them out!  I decided on the chevron stripes and the polka dots for the skirt and the floral for the bumper.


I really liked this simple style of skirt so I attempted it.  I liked the idea of a different pattern at the bottom and I did have three patterns.  I think this bedding is from Pottery Barn Kids.


I had to write my plan all out to make sure I made the cuts right and you will see later that my pregnancy brain really set in with this.  I ended up wasting some material, but that's all part of the experience, right??  :)


The top rectangle is the front of the crib and the one on the bottom is the sides of the crib.  The piece of material that I had was just short of being long enough to span the entire 53" that I needed so I ended up making that into two separate pieces, which is kind of what the picture above looked like.

So I got the two front sides all measured and cut AND pinned, then I remembered that I was going to put the polka dot material on the bottom.  (palm, meet forehead) DUH!  So then I had to take off my shoes and use my toes for the math and recalculate everything.  This is where my mom will tell you that I've never been great at general math.


I remeasured, re-cut and got everything pinned to be ready to sew.  I wasted a little material trying to get chevron stripes to match up as best as possible (another lesson learned).  Then came the easy part, the sewing!

I got so into the project that I forgot to take many pictures during the process, but most of the pictures on the blog that I got the tutorial from are pretty accurate to what I did, with the exception of the bottom piece of material with the different pattern.

I sewed up the seams on all four sides of the pieces and then got some ribbon that I had on hand and sewed those pieces of ribbon to the tops of the sections to tie them to the springs.  I think that the binder clips in the tutorial will actually work much better for my crib because of the way the springs are under the mattress.


I got the front and one side finished that night.  With the "mess-ups" that I had I think I'm going to have to go get another half yard to make the other side of the skirt, but I think it will go fairly quickly since I now know what I'm doing.  My friend Sarah gave me several of her crib sheets from her girls and I went with one that was light pink and white stripes.  Next I'm going to be tackling the bumpers with the floral material.


I was getting pretty nervous about how it would all go together but I held it up last night and I think it will look amazing!  I'm really excited about how the pinks, oranges, and yellows will pop and really "work" with the other colors I have.  Stay tuned for the DIY Crib Bumper post to come soon!  I would really like to get this finished pretty soon!